- Create a virtual environment(avoid polluting the system-level Python environment)
- Clone the ComfyUI code repository
- Install dependencies
- Start ComfyUI
Python 3.13 is very well supported. If you have trouble with some custom node dependencies on 3.13 you can try 3.12.Python 3.14 will work if you comment out the
kornia dependency in the requirements.txt file (breaks the canny node) but it is not recommended.Create a virtual environment
Install Miniconda. This will help you install the correct versions of Python and other libraries needed by ComfyUI. Create an environment with Conda.Clone the ComfyUI code repository
You need to ensure that you have installed Git on your system. First, you need to open the terminal (command line), then clone the code repository.- Windows
- Linux
- MacOS
Install GPU and ComfyUI dependencies
1
Install GPU dependencies
Install GPU Dependencies
Nvidia
Nvidia
Nvidia users should install stable pytorch using this command:Alternatively, you can install the nightly version of PyTorch.
Install Nightly
Install Nightly
This is the command to install pytorch nightly instead which might have performance improvements:
Troubleshooting
Troubleshooting
If you get the “Torch not compiled with CUDA enabled” error, uninstall torch with:And install it again with the command above.
AMD (Linux)
AMD (Linux)
AMD users can install rocm and pytorch with pip if you don’t have it already installed, this is the command to install the stable version:Alternatively, you can install the nightly version of PyTorch.
Install Nightly
Install Nightly
This is the command to install the nightly with ROCm 7.0 which might have some performance improvements:
AMD Experimental (Windows and Linux)
AMD Experimental (Windows and Linux)
RDNA 3 (RX 7000 series):RDNA 3.5 (Strix halo/Ryzen AI Max+ 365):RDNA 4 (RX 9000 series):
Intel
Intel
Intel Arc GPU users can install native PyTorch with torch.xpu support using pip. More information can be found here.Option 1: Install PyTorch xpuTo install PyTorch xpu, use the following command:
Option 2: Intel Extension for PyTorch (IPEX)Alternatively, Intel GPUs supported by Intel Extension for PyTorch (IPEX) can leverage IPEX for improved performance.Visit Installation for more information.
Install Nightly
Install Nightly
This is the command to install the Pytorch xpu nightly which might have some performance improvements:
Mac ARM Silicon
Mac ARM Silicon
You can install ComfyUI in Apple Mac silicon (M1 or M2) with any recent macOS version.Install pytorch nightly. For instructions, read the Accelerated PyTorch training on Mac Apple Developer guide (make sure to install the latest pytorch nightly).
Remember to add your models, VAE, LoRAs etc. to the corresponding Comfy folders (models/checkpoints, models/vae, etc.).
Ascend NPUs
Ascend NPUs
For models compatible with Ascend Extension for PyTorch (torch_npu). To get started, ensure your environment meets the prerequisites outlined on the installation page.Step-by-step guide:
- Begin by installing the recommended or newer kernel version for Linux as specified in the Installation page of torch-npu, if necessary.
- Proceed with the installation of Ascend Basekit, which includes the driver, firmware, and CANN, following the instructions provided for your specific platform.
- Next, install the necessary packages for torch-npu by adhering to the platform-specific instructions on the Installation page.
- Finally, follow the ComfyUI manual installation guide for Linux. Once all components are installed, you can run ComfyUI as described earlier.
Cambricon MLUs
Cambricon MLUs
For models compatible with Cambricon Extension for PyTorch (torch_mlu).Step-by-step guide:
- Install the Cambricon CNToolkit by adhering to the platform-specific instructions on the Installation
- Next, install the PyTorch(torch_mlu) following the instructions on the Installation
- Launch ComfyUI by running
python main.py
Iluvatar Corex
Iluvatar Corex
For models compatible with Iluvatar Extension for PyTorch.Step-by-step guide:
- Install the Iluvatar Corex Toolkit by adhering to the platform-specific instructions on the Installation
- Launch ComfyUI by running
python main.py
2
Install ComfyUI dependencies
3
Start ComfyUI
Start the application
How to update ComfyUI
1
pull the latest code
Use the command line to enter the installation path of ComfyUI, then pull the latest code.
2
install the dependencies
Use the command line to enter the installation path of ComfyUI, then install the dependencies.
Adding Extra Model Paths
If you want to manage your model files outside ofComfyUI/models, you may have the following reasons:
- You have multiple ComfyUI instances and want them to share model files to save disk space
- You have different types of GUI programs (such as WebUI) and want them to use the same model files
- Model files cannot be recognized or found
extra_model_paths.yaml configuration file
Open Config File
- Portable/Manual Install
- ComfyUI Desktop
For the ComfyUI version such as portable and manual, you can find an example file named Copy and rename it to
extra_model_paths.yaml.example in the root directory of ComfyUI:extra_model_paths.yaml for use. Keep it in ComfyUI’s root directory at ComfyUI/extra_model_paths.yaml.
You can also find the config example file here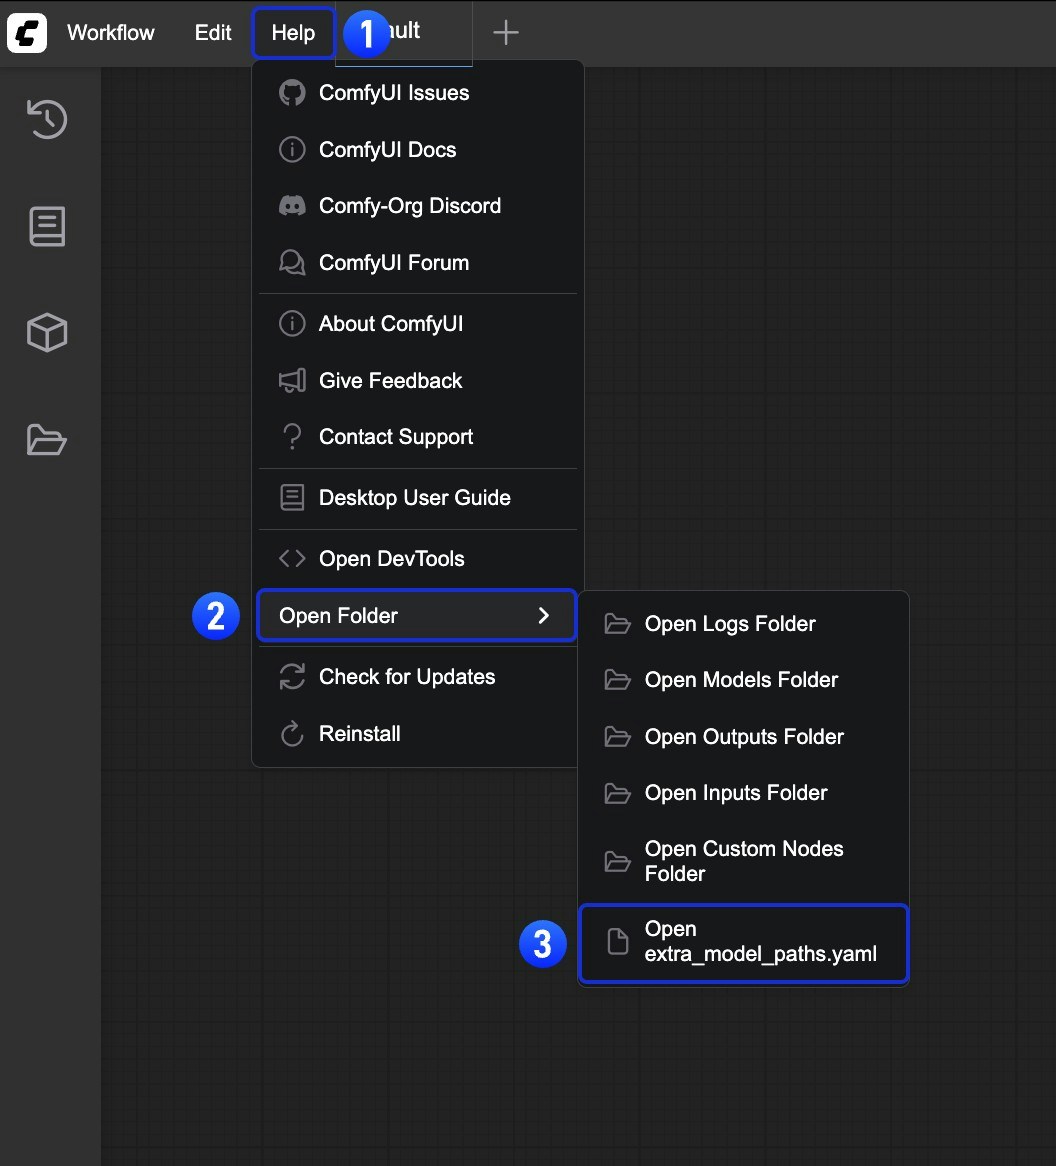
Example Structure
Suppose you want to add the following model paths to ComfyUI:extra_model_paths.yaml file like below to let ComfyUI recognize the model paths on your device:
D:\stable-diffusion-webui\, you can modify the corresponding configuration to